meta data for this page
Windows connect to SQL database
In this set up tutorial, we will be dowloading Heidi SQL, generating a connection from your desktop to the database via an SSH tunnel, and showing users what it looks like when you are connected to ICE-D!
![]()
We will be using SSH (”secure shell”) through an intermediate gateway host to talk to the database server. We will be using SSH ”key-pair” authentication, which requires that you generate a code key on your machine and send it to me to be installed on the gateway host. Once the key pair is installed on both machines they can make a secure connection without the need to enter a password each time. Thus, the connection is machine-specific…a key pair installed on your laptop will not also work on your desktop.
Step 1. Begin the tutorial by navigating over to https://www.heidisql.com/ and download the latest version of Heidi SQL (as of the date listed on this tutorial, I am successfully using version 11.3).
In addition, unlike Mac operating systems, Windows does not automatically have an SSH program installed so you must install one on your own. I use PuTTY (https://www.chiark.greenend.org.uk/~sgtatham/putty/latest.html). Installing PuTTY will also install an SSH key generator called PuTTY Key Generator or PuTTYgen for short.
![]()
Step 2. Open PuTTYgen and use the default settings to generate a key. Make sure the key type is RSA! This will involve making random movements with your mouse. This should have generated both a ”public” and a ”private” ssh key. The public key should be printed in the box near the top of the window. Copy this and email it to Joe Tulenko (jtulenko@bgc.org) or Greg Balco (balcs@bgc.org). Save the private key in the following directory:

This is not a standard directory (i.e., you probably shouldn’t try to make it yourself), but it should either already exist or it might be auto-generated when you use PuTTY.
Step 3. Now that we’ve dealt with SSH keys, open HeidiSQL to connect to the database. The Session Manager window will open, which is where you’ll input the connection parameters. First, make a new Session and give it a sensible name (e.g., ICED remote). Use the template below for the Settings tab (make sure under network type you choose ”MariaDB or MySQL (SSH tunnel); this option is not the default):
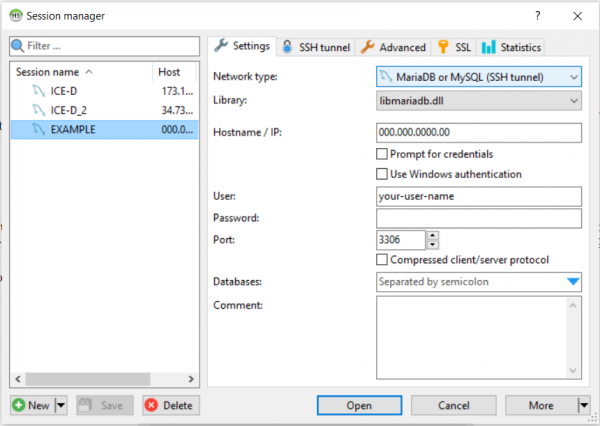
Ask Greg (balcs@bgc.org) for the correct IP address to put in the ’Hostname/IP’ field. The User name and Password here are for your ICE-D MySQL account. Talk to Greg (balcs@bgc.org) or Joe (jtulenko@bgc.org) about getting this set up if you haven’t already. In general, users will be using our basic account that has read privileges only. The Databases field can be left empty.
Use the following template for the SSH tunnel tab:

Set the plink.exe location to wherever plink.exe is installed locally on your machine. It will probably be very similar to the example above. Ask Greg or Joe for the correct host name to put in the ’SSH host+port’ field. ”Username” here pertains to your username on the SSH gateway machine, which is ”iced.” Leave the Password blank… it is not needed for key pair authentication. Set the Private key file to the location of the private SSH key that you generated using PuTTYgen.
Step 4. Okay, now try opening the connection. In theory, everything should work. Please email either Greg (balcs@bgc.org) or Joe (jtulenko@bgc.org) if you have any issues with the set up. Here is a screen shot of what the samples tab in ICE-D Alpine looks like when successfully connected and viewing the data:

Thanks for following along!